Seamless CI/CD with Azure DevOps and Databricks: Automating Data Engineering Workflows
Blogs

Understanding the Difference: Generative AI and Large Language Models
September 8, 2025Disaster Recovery setup in Postgres
November 24, 2025
As your data projects grow, handling code changes manually can quickly become slow, messy, and prone to mistakes. That’s where CI/CD—Continuous Integration and Continuous Deployment—can make a big difference.
If you’re working with Databricks on Azure, connecting it with Azure DevOps can really streamline your development workflow and help you deliver updates more reliably.
In this blog, will walk you through:
- Why CI/CD is important for Databricks projects
- How to set up Azure DevOps pipelines
- A simple real-world example: deploying a Databricks notebook using DevOps
1. Why CI/CD is important for Databricks projects?
- Same setup every time: Ensures the same code runs the same way in all environments.
- Quick issue detection: Catches problems early before they cause bigger issues.
- Faster updates: Speeds up the process of getting new code into production.
- Track every change: Keeps a history of changes so you can undo or audit easily.
- Safer deployments: Secrets and settings are managed securely.
- Team-friendly: Makes it easy for multiple people to work together smoothly.
2. How to integrate Databricks with Azure DevOps?
Connecting Databricks with Azure DevOps enables seamless automation of your code deployments. Here’s a simple, step-by-step approach to get started:
Step 1: Organize and Store Your Code in Git
Start by storing all your notebooks, scripts, and configuration files in a Git repository-preferably in Azure Repos (or GitHub if you’re using that).
Step 2: Link Your Databricks Workspace with Azure DevOps Git
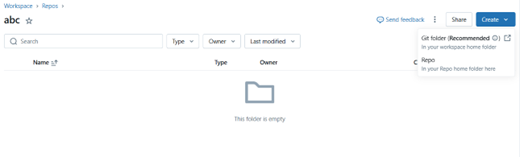
In your Databricks workspace, go to your workspace tab – Click on Repos folder, create a folder.
You will get to see two options as below:
- Git Folder: Creating a repo inside the folder you have created.
- Repo: Creating a repo(folder) inside the Repo home folder.
You will see a dialog box as below, where you need to provide the git repository url, which git provider you are using and a folder name.

This enables you to use Git features like versioning, committing, and branching directly from the Databricks UI.
Step 3: Set Up a CI/CD Pipeline
Head to Azure DevOps and create a new pipeline (using YAML).
In the pipeline, use the Databricks CLI or Databricks REST APIs to automate tasks such as:
- Running unit tests or validation scripts
- Deploying notebooks or job definitions
- Managing clusters or workflows
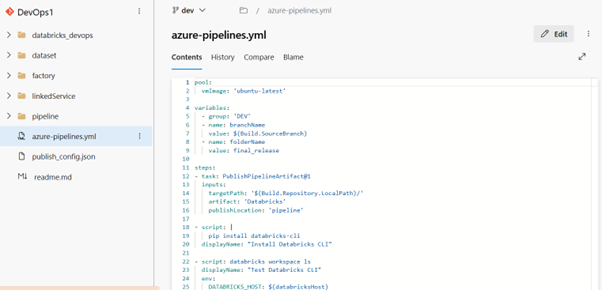
Below is an example pipeline,
Step 4: Secure Your Credentials
Use Azure DevOps secrets (or Azure Key Vault) to securely store:
- Your Databricks workspace URL
- Your Databricks personal access token (PAT)
Reference these secrets in your pipeline so you can authenticate securely during deployment.
Step 5: Automate Testing and Deployment
Configure your pipeline to automatically:
- Run tests (if applicable)
- Deploy notebooks to staging or production folders
- Trigger Databricks jobs or workflows post-deployment
With this setup, your data engineering or analytics projects become more reliable, consistent, and scalable – while freeing your team from manual deployment steps.
Conclusion:
Connecting Databricks with Azure DevOps makes your work easier and more reliable. Instead of manually copying code or running jobs, everything happens automatically when you make changes. It keeps your notebooks organized, your team in sync, and your updates safe and consistent. It’s a simple setup that saves time and helps you move faster with fewer mistakes.
Pallavi A