A Step-by-Step Guide to Update Patch on SQL Server Always on Availability Group Cluster
Blogs
Automating Restoration of Transaction Log Backups in SQL Server Using Python
December 19, 2023
DAX Query View – DMVs for Power BI Model using DAX functions
February 1, 2024
In the fast-paced world of database management, staying up-to-date with the latest cumulative updates (CUs) is crucial to ensure optimal performance, security, and to address any known issues. In this guide, we will walk you through the process of updating SQL Server 2019 with CU 22, providing a comprehensive roadmap that can be adapted for other SQL Server versions and patch updates.
Note: This article talks about patch update to SQL Server version 2019 with cumulative update 22, but this can be utilized to update any SQL Server version to any cumulative update.
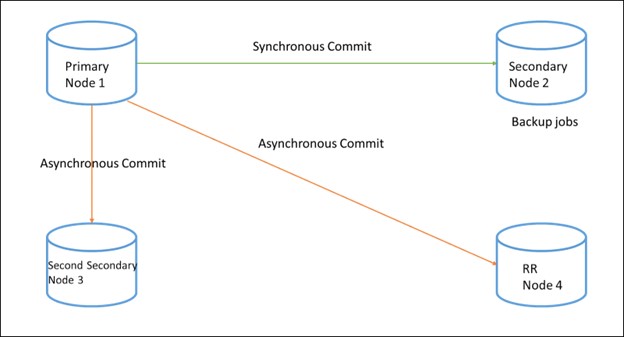
Overview of Current Architecture:
Before diving into the update process, let’s briefly review the current architecture of the SQL Server databases that we will be working on:
Approach overview:
- Here we will consider node 1,2,3 and 4 for nomenclature because primary and secondary can change according to failover and fallback.
- Considering our architecture we have one synchronous commit (node 2) node and two asynchronous commit nodes(node 3 and 4).
- All the nodes are on CU19.
- Target CU is 22.
- We will be updating all nodes one by one. Will update node 4 first then node 3, node 2 and finally node 1.
- The node which we will be updating will keep in asynchronous commit mode.
- At any given moment we will be having one primary and secondary node in sync and one async node and another node would be updating the patch.
Pre patch work:
This step will apply to all nodes before we update the patch
- Take a full backup of the database, as a safety net in case of any unknown issue.
- Run DBCC CHECKDB command on all the databases. This step is recommended but this takes a lot of time to complete, so plan accordingly based on the behavior of your server.
Steps to perform patch update:
- With below steps will do the patch update for node 3 (as node 3 is second secondary and in async commit mode)
- Verify if failover mode is manual for node 3 or not. If not, mark it as manual.
- Suspend data movement at node 3
- Disable all jobs running in node 3.
- RDP to the node 3, download the CU22 from gcp/aws/azure storage or copy it from local machine.
- Once the package is downloaded, install it by double clicking on it. In the installation pop-up follow the default configurations. Once the installation is done it will automatically restart SQL Server services and gives a pop-up for system restart.
- Once we restart the system, services will restart automatically.
- RDP to the node 3 after restart, and check below points
- Verify SQL Services are online.
- SQL Server version validation.
- Verify SQL Server error logs for any errors, warnings.
- It is also recommended to perform a database consistency checker (DBCC CHECKDB) after applying the patches.
- Now resume the data movement.
- Enable all the jobs are started and running.
- Check the status of node 3 in AG dashboard, it will be synchronizing.
- Check the dashboard for synchronization state, Estimated recovery time(sec) and Estimated data loss(minute).
- Repeat the same steps as mentioned in step 1 for node 4 (As node 4 is in asynchronous commit mode and node 1 and node 2 are in synchronous commit mode).
- Verify the installation of CU 22 on node 4.
- Now nodes 3 and 4 are at CU 22 service pack and nodes 1 and 2 are in CU 19 service pack.
- Now to apply CU 22 to nodes 1 and 2, we need to remove the node from synchronous commit and put it to asynchronous commit. Will proceed with node 2 first.
- Once the node 3 status is synchronized, will change synchronous commit to asynchronous commit mode for node 2.
- Follow the same step for node 2 as mentioned in step 1.
- Once the status is synchronizing for node 2 will change the commit mode to synchronous for node 2 and change commit mode for node 3 as asynchronous commit mode.
- Once node 2 is synchronized, then do the manual failover from node 1 to node 2
- Now node 2 is primary and node 1 is secondary and both are in synchronous commit mode along with node 3.
- Change the commit mode to asynchronous for node 1.
- Repeat the same steps for node 1 as mentioned in step 1.
- Once the node restarts, change commit mode to synchronous.
- Wait for synchronized status.
- Failback to the node 1, it will make node 1 primary and node 2 secondary.
- Check AG dashboard and verify the state of databases. Now every node is in their previous state.
NOTE:
There are some known issue which comes with CU 22, so before updating any CU patch we should do the NFR on dev environment and look for issue related errors.
Known issues with CU 22:
- Issue one
SQL Server 2019 CU14 introduced a fix to address wrong results in parallel plans returned by the built-in SESSION_CONTEXT. However, this fix might create access violation dump files when the SESSION is reset for reuse. To mitigate this issue and avoid incorrect results, you can disable the original fix, and also disable the parallelism for the built-in SESSION_CONTEXT. To do this, use the following trace flags:
11042 – This trace flag disables the parallelism for the built-in SESSION_CONTEXT.
9432 – This trace flag disables the fix that was introduced in SQL Server 2019 CU14.
Microsoft is working on a fix for this issue and it will be available in a future CU.
- Issue two
After you install this cumulative update, external data sources using the generic ODBC connector may no longer work. When you try to query external tables that were created before installing this cumulative update, you receive the following error message:
Msg 7320, Level 16, State 110, Line 68
Cannot execute the query “Remote Query” against OLE DB provider “MSOLEDBSQL” for linked server “(null)”. Object reference not set to an instance of an object.
If you try to create a new external table, you receive the following error message:
Msg 110813, Level 16, State 1, Line 64
Object reference not set to an instance of an object.
To work around this issue, you can uninstall this cumulative update or add the Driver keyword to the CONNECTION_OPTIONS argument. For more information, see Generic ODBC external data sources may not work after installing Cumulative Update.
Conclusion:
Keeping your SQL Server up-to-date is vital for performance, security, and issue resolution. By following this step-by-step guide and being aware of potential issues, you can ensure a smooth update process while minimizing the impact on your database environment. Always perform non-functional testing in a development environment to catch and address any issues before applying updates to your production environment.
Naveen Kumar Singh