Using Azure Data Factory to Copy SharePoint List Data to Blob Storage
Blogs

Streamlining Data Ingestion with Databricks Auto Loader
July 13, 2025
Druid Ingestion Methods: A Deep Dive into Batch Ingestion
August 15, 2025Using Azure Data Factory to Copy SharePoint List Data to Blob Storage
Before integrating SharePoint with Azure Data Factory to move data into Azure Blob Storage, it is important to ensure that the SharePoint list is properly set up and contains the required data.
SharePoint Online is a web-based collaboration platform from Microsoft that integrates with Microsoft 365. It allows organizations to store, organize, share, and access information from any device. One of SharePoint’s most used features is the SharePoint List, a structured way to store tabular data like an Excel spreadsheet or a database table.
In Azure Data Factory, the SharePoint List connector enables integration with SharePoint lists. It is supported in both the Copy activity and the Lookup activity and works with both Azure Integration Runtime and Self-hosted Integration Runtime.
SharePoint List Online connector uses service principal authentication and retrieves data via OData protocol.
Before building the pipeline, service principal authentication must be set up.
- Register an App in Microsoft Entra ID (Azure AD)
- Go to Azure Portal →App registrations → New registration.
- Provide
Name: ADF-SharePointConnector
Select supported account types: single tenant
Leave redirected URL empty then Register. - After creation, note the Application (client) ID and Directory (tenant) ID.
2. In the registered app, there are two options for configuring authentication under Certificates & secrets:
- Option A: Upload a certificate (used with ServicePrincipalCert)
- Option B: Create a new client secret (used with ServicePrincipalKey)
Note: This guide follows Option A (ServicePrincipalCert).
To proceed with Option A, click on “Add a certificate or secret”, then under the Certificates section, upload the required certificate.
To Generate a .pfx Certificate using PowerShell (Windows) follow below steps:
Step 1: Open PowerShell as Administrator
Step 2: Run the following code
# Generate a self-signed cert
$cert = New-SelfSignedCertificate `
-Subject “CN=ADF-SharePointConnector” `
-CertStoreLocation “cert:CurrentUserMy” `
-KeyExportPolicy Exportable `
-KeySpec Signature `
-NotAfter (Get-Date).AddYears(1)
# Secure password to protect the PFX file
$password = ConvertTo-SecureString -String “<Password>” -Force -AsPlainText
# Export to PFX file
Export-PfxCertificate `
-Cert $cert `
-FilePath “C:UsersYourUsernameDocumentsadf-sharepoint.pfx” `
-Password $password
Note: Provide the password and the filepath.
Step 3: Convert .pfx File to Base64 (PowerShell) because .pfx file is not supported in Azure data factory so there you need to pass base 64 text file.
To convert run the below code:
[Convert]::ToBase64String([IO.File]::ReadAllBytes(“C:UsersYourUsernameDocumentsadf- sharepoint.pfx “)) | Set-Content -Path ” C:UsersYourUsernameDocumentsadf-sharepoint-base64.txt”
- Azure Data Factory needs to authenticate to SharePoint Online using a service principal and its certificate.
- The .pfx file contains the private key + public key certificate, which ADF must use to prove identity.
- ADF’s linked service configuration expects the certificate to be provided as a base64-encoded string (not the raw binary .pfx file).
- The base64 string lets you safely embed the entire .pfx content as text inside the JSON or UI configuration of the linked service.
Step 4: Azure AD App Registration excepts the certificate upload to be the public key only, typically in one of these formats: .cer, .pem, or .crt not a .pfx file, which contains both the private and public keys plus the password.
You have to extract the public key certificate from your .pfx file and save it as a .cer file, then upload that file.
To achieve this run the below code:
$pfx = New-Object System.Security.Cryptography.X509Certificates.X509Certificate2
$pfx.Import(“C:Users YourUsername Documentsadf-sharepoint.pfx”, “<PFX password>” [System.Security.Cryptography.X509Certificates.X509KeyStorageFlags]::Exportable)
$pfx.Export([System.Security.Cryptography.X509Certificates.X509ContentType]::Cert) | Set- Content -Encoding Byte -Path “C:Users YourUsername Documentsadf- sharepoint.cer”
Note: Replace the correct password and file path.
Step 5: Configure API Permissions
- In the left-hand menu, select API permissions, then click on the Add a permission button.
- In the new blade that appears, choose either Microsoft Graph or SharePoint as the API. In this guide, Microsoft Graph is chosen because it provides better and more complete access to SharePoint files and their content. Unlike the SharePoint API, Microsoft Graph makes it easier to move files from SharePoint document libraries to Azure Blob storage.
Microsoft Graph API is a unified endpoint that provides access to a wide range of Microsoft 365 services, including SharePoint, OneDrive, Outlook, Teams, and more. It is recommended for modern applications due to its broader capabilities and consistent authentication model.
SharePoint API offers direct access specifically to SharePoint resources and is used in legacy or SharePoint-specific use cases.
- Under the Application permissions, choose Application permissions. Expand the Sites section and select FullControl. All and Files.ReadWrite. All
Note: This application permission requires admin consent before it can be used within the tenant.
- To grant this permission, return to the API permissions section. Click on the Grant admin consent for {{organization name}} button and confirm the action by selecting Yes.
3. Build the pipeline in ADF
Step 1: Set up the Source (SharePoint List)
Create a Source Linked Service to SharePoint. In Azure Data Factory, go to:
Manage > Linked services > New
- Choose SharePoint Online List as the connector and provide the following details:
Name: Provide a recognizable name for the linked service.
Integration Runtime: Choose either AutoResolveIntegrationRuntime or selfhosted IR.
Site URL: Provide the SharePoint site URL (e.g., https://yourtenant.sharepoint.com/sites/ADF-DataSite).
Tenant ID: Use the tenant ID from your Azure AD app registration.
Service Principal ID: Use the Application ID from your registered app.
Authentication Method: Select Service Principal Certificate.
Certificate: Upload the base64-encoded .pfx file content (saved as .txt).
Certificate Password: Provide the password used while creating the .pfx.
Click Test Connection to verify, then create the linked service.
Dataset: Create the Source Dataset to SharePoint. Go to Author > Datasets > New Dataset
- Select SharePoint Online List
- Choose the Linked Service created above
- Specify the List Name exactly as it appears in SharePoint
Step 2: Set up the Sink (Azure Blob Storage)
- Create Azure Blob Storage Linked Service. Go to Manage > Linked services > New in Azure Data Factory.
- Choose Azure Blob Storage as the connector.
- Configure the following details:
Name: Provide a name for the linked service (e.g., AzureBlobStorage_linked_service)
Integration Runtime: Select AutoResolveIntegrationRuntime (default) or a self-hosted Integration Runtime
Authentication Type: Account key (used in this guide)
Account Selection Method: Select Enter manually to provide connection details directly
Storage Account Name: Enter the name of the storage account.
Storage Account Key: Provide the access key for the storage account (available in the Azure portal).
Click Test Connection to validate the configuration, then click Create to save the linked service.
- Create the Sink Dataset for Azure Blob Storage. Go to:
Author > Datasets > New Dataset - Select Azure Blob Storage
- Choose the Linked Service created above
- Select the appropriate file format (e.g., CSV)
- Specify the container name and the folder path where the output file will be stored. The container can be created in the storage account via the Azure Portal, if it does not already exist.
- Provide the desired output file name (e.g., outputdata) and then create.
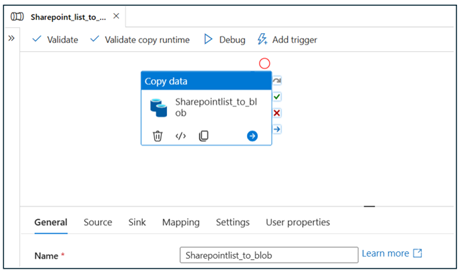
Step 3: Create the Copy Activity
In the ADF pipeline:
- Add a Copy activity.
- Set the source as the SharePoint List dataset.
- Set the sink as the Azure Blob Storage dataset.
- Validate the pipeline, then publish and run it.
Conclusion
Integrating SharePoint Online with Azure Data Factory enables automated and secure data movement into Azure Blob Storage. By setting up a SharePoint list, configuring service principal authentication using a certificate, and leveraging the SharePoint Online List connector in ADF, data can be efficiently extracted and loaded into Blob Storage. Using Microsoft Graph API enhances access to SharePoint content, making it suitable for modern data workflows. This end-to-end solution simplifies data integration across Microsoft 365 and Azure, supporting scalable and automated analytics pipelines.
Chandana R L